
 2
2 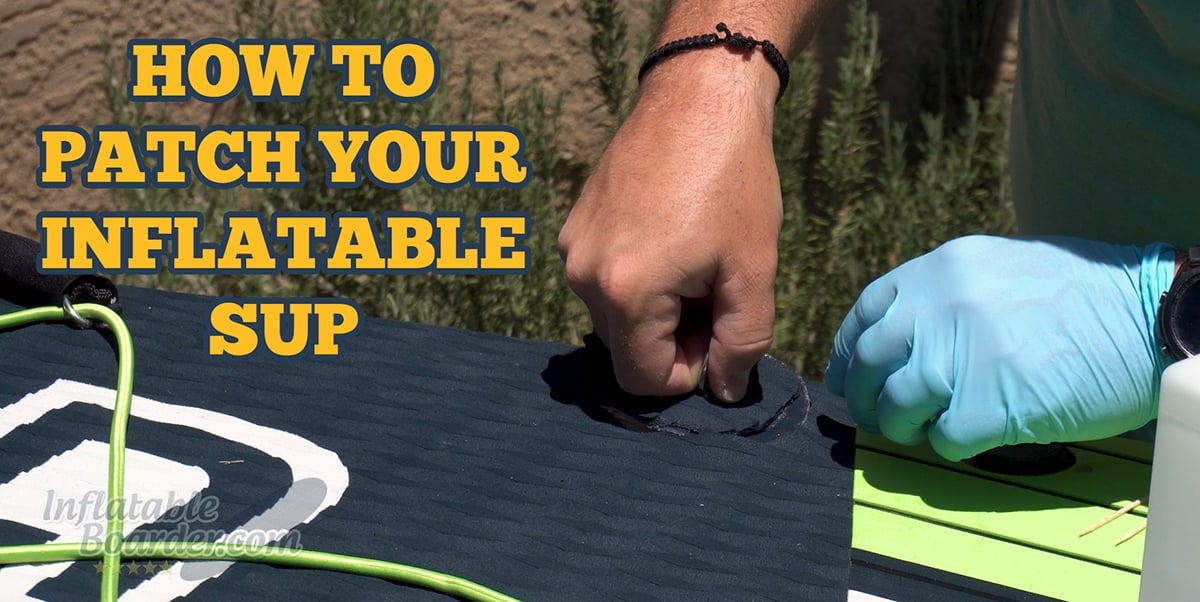
Fixing a leak or puncture in your iSUP is an easy at-home repair.
Accidents happen and equipment needs regular maintenance whether it is a car, bicycle, skis, or a paddle board. One of the most common worries about inflatable paddle boards is punctures. While the PVC material used in iSUP manufacturing is quite durable and rather resistant to puncture, sometimes it still happens. Usually while we’re on land, and usually while we’re moving the board around (at least that’s how all of my punctures have occurred!).
Fortunately, patching an iSUP is an easy task that takes just a few minutes of your time.
In addition to this blog post, we’ve also created a video showing all of the steps for an iSUP patch repair on our YouTube channel.
Gather Your Materials
You won’t need a whole lot of items or specialized tools to patch your iSUP, and most iSUPs come with a repair kit that has almost everything you need. Most other items can be found at any hardware store. Adhesives may need to be purchased from boat supply stores, though Aquaseal can often be found in fishing wader repair kits as well.
What you’ll need:
- PVC Patch (at least 1” larger than your puncture, 2-3” for larger punctures or tears)
- Adhesive – this often comes with your patch kit. Otherwise use Aquaseal, HH-66 Vinyl Cement, Stabond PVC Boat Adhesive, or Clifton’s PVC Adhesive. Do not use PVC pipe glue, super glue, gorilla glue, epoxy, or anything not explicitly for PVC boat repair.
- Small brush, toothpicks, or other device to spread your glue evenly (if not included with the adhesive)
- Nitrile gloves, safety glasses
- 100-150 grit sandpaper
- Rubbing Alcohol or MEK solvent
- 10-20 lbs of weight
- Roller (optional)
Once you have everything ready you’ll need to set up for your repair in a well-ventilated area. If using MEK solvent you’ll want to be outdoors or use an appropriate VOC-rated respirator.
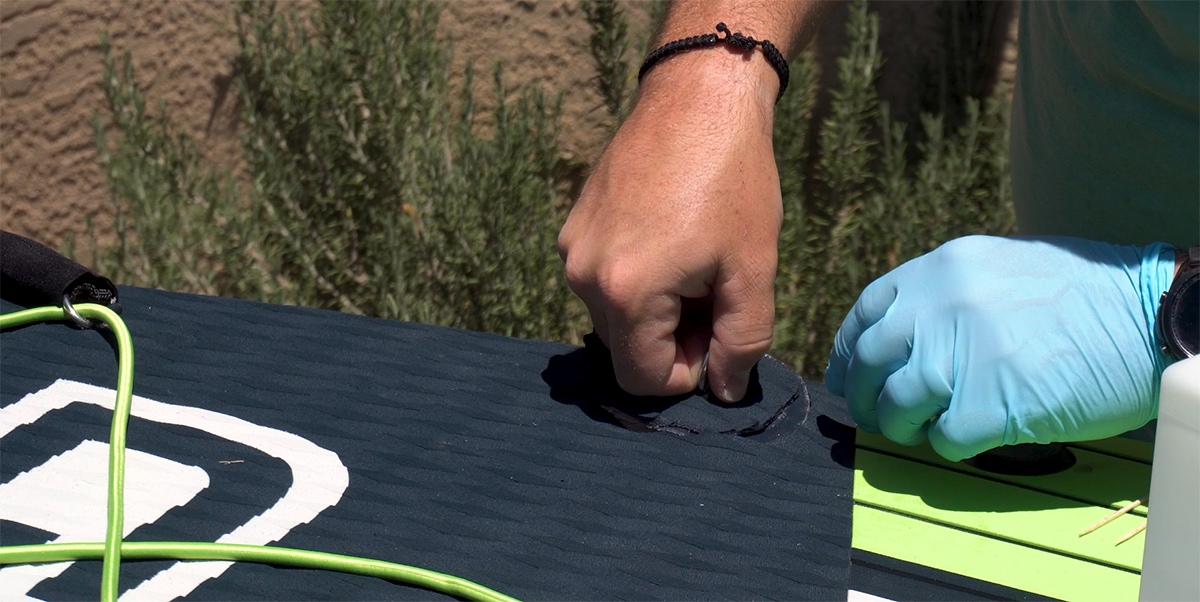
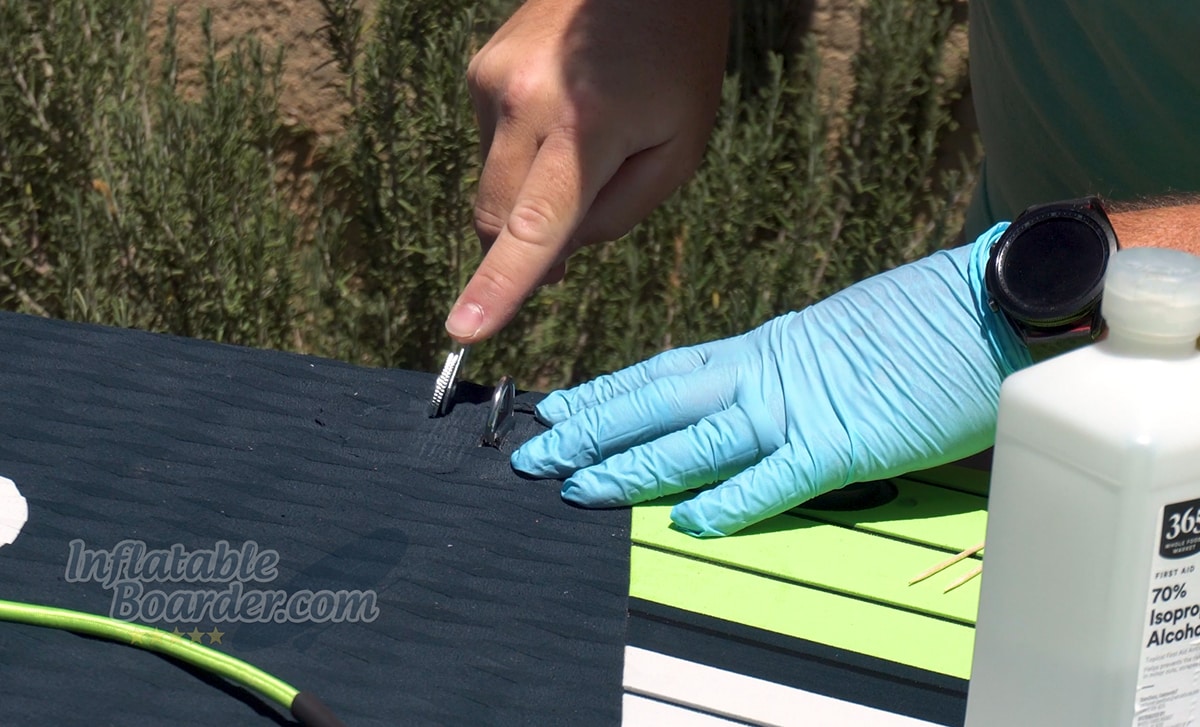
If you are repairing a puncture, you’ll need to locate the puncture by inflating the board to a few PSI, and spray soapy water on the board to locate the hole (look for a stream of bubbles forming). Mark the hole with a pencil. If you are adding a D-ring or other glue-on accessory, I find it easiest to do with the board inflated to between 7-10 PSI to make sure you glue the new accessory on flat.
Pop on your PPE (gloves and glasses) and you’re ready to begin.
Prep Your Surfaces
The first step in patching your iSUP is to prepare both the patch and the board.
Once you’ve located the puncture you’ll want to cut your PVC patch to the correct size. The patch should be at least 1” larger than the puncture in all directions, though a bigger patch (2-3” larger) is recommended for punctures larger than 0.25” (6 mm). Always cut your patches in circles or ovals. Corners tend to “catch” and fail easier than rounded edges.
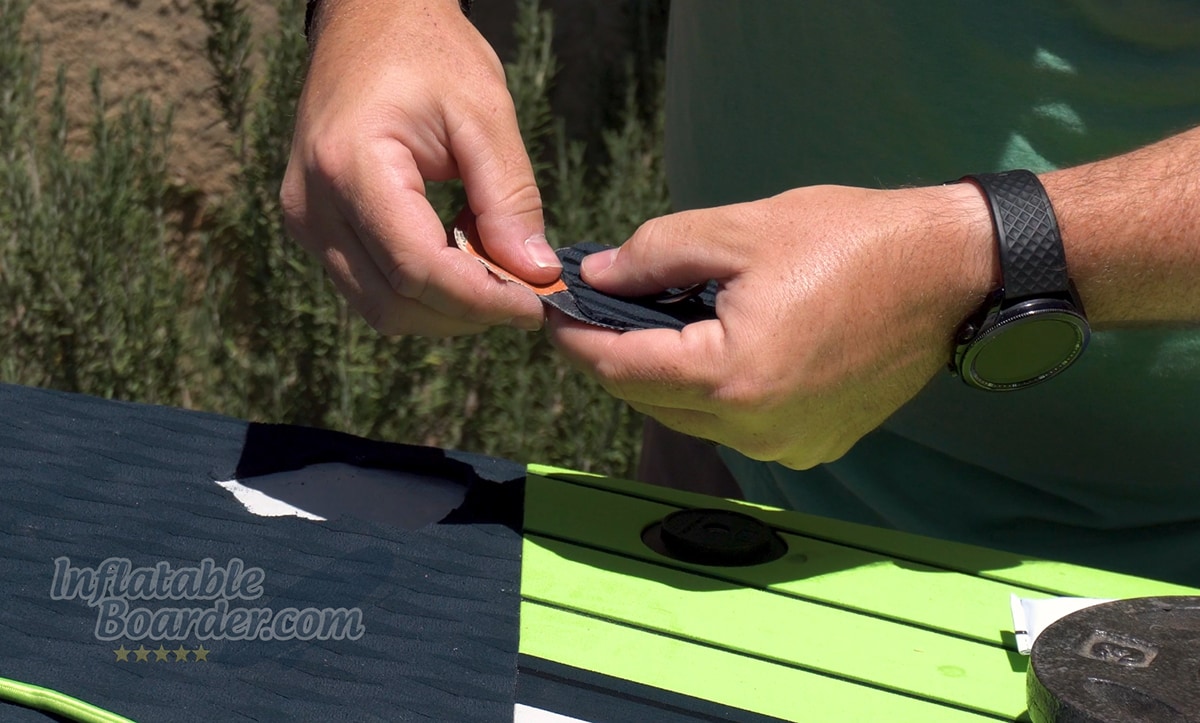
Lightly sand the entire surface of both your patch and the work area of your iSUP.
Remove any dirt or large debris, then use your sandpaper to scuff the surface of the patch and the area of the board where the patch will be applied. I like to lay my patch out and draw a circle around it on the board with a pencil so I know exactly where I need to prep. Scuffing the surface provides more surface area for the adhesive to bond the layers – just like how a textured deck pad provides more grip than the smooth PVC deck!
Once both surfaces are lightly and evenly scuffed, you’ll need to clean both surfaces. I prefer to do this with rubbing alcohol the vast majority of the time. MEK solvent (Methyl Ethyl Ketone) is a powerful solvent that also does a fantastic job of preparing these surfaces, however you have to be extremely careful as an accidental spill could literally melt a hole in your paddle board.
After wiping both surfaces with rubbing alcohol to remove any dust, you’re ready to apply the glue.
Gluing and Curing
Nearly all of the adhesives recommended above work the same way – you’ll apply adhesive to both surfaces and allow it to become tacky. Some (like Clifton’s) may have optional accelerators you can use as well. Always fully read the instructions for your adhesive before application.
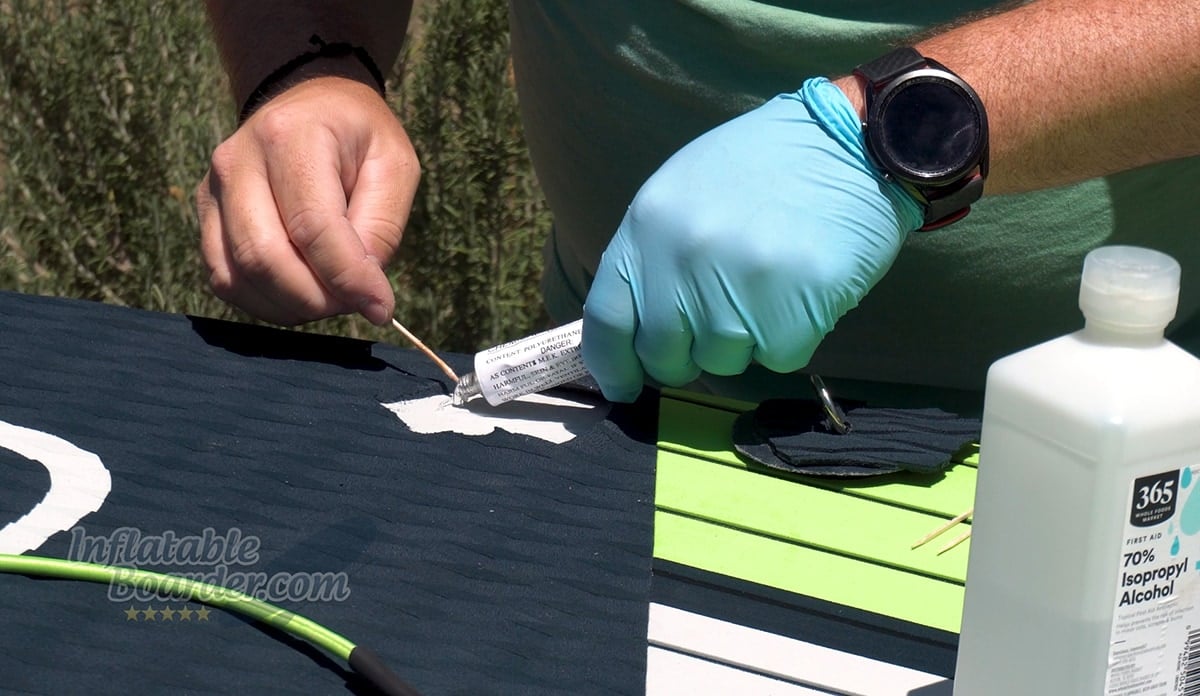
Spread a thin layer of glue on the repair area of the board and the patch. Allow it to become tacky before applying the patch.
It can take anywhere from 1-10 minutes for the adhesive to become tacky depending on the adhesive, temperature, and humidity. If it’s your first time working with this adhesive it might be a good idea to test how long this takes on some scrap items.
Once the adhesive is tacky, you are ready to place your patch. These adhesives are contact adhesives, so they will bond together rapidly once they touch. Make sure your patch is lined up before applying it as you may not be able to move it easily once the two parts touch.
Place the patch onto the board by starting on one edge and pressing it across to the other edge to avoid trapping air.
Place the patch onto the board starting on one side and pressing it down toward the opposite side to prevent trapping air between the two. Once the patch is on the board use your roller or your knuckle to press the patch onto the board starting from the center of the patch and working outward. This will help push out any air bubbles that may be trapped inside and help force the two materials together for a better bond. Clean up any excess glue with some paper towel and rubbing alcohol if needed.
Use a roller or your knuckle to press the patch into the board and remove any trapped air.
Once you’ve rolled out the patch, place your weight over the patched area to continuously apply pressure while the adhesive cures. Generally, most adhesives will be fully cured within 8 hours. Follow the instructions on your adhesive for proper curing times.
Note: If you are patching near a seam or other location where two layers of PVC overlap, the small gap created by the two layers can sometimes be difficult to patch properly. If the patch overlaps this area, use Aquaseal, or another appropriate adhesive that is very thick, to place a bead of adhesive in the “gap” before placing the patch. When you roll out the patch you’ll want to ease up in this area rather than squeezing all of the excess glue out. I like to leave a very small dot of adhesive poking out of the patch here rather than cleaning it completely off.
Double Check and Hit the Water
After the adhesive has finished curing, inflate your board to its maximum recommended pressure and check the area for leaks using soapy water. If the patch is leaking it may have been from improper adhesion or a wrinkle when applying the patch. It is possible to remove the patch with some careful application of heat, pliers, and a thin, dull metal object (like a butter knife), however it may be best to simply patch over the area again with a larger patch (again at least 1” larger in all directions than the original patch).
Once the leak is patched you are ready to get back out on the water!
Emergency Repairs
Accidents do happen on the water, and it is possible to accidentally puncture your board during use. If you are on a longer trip this could be potentially dangerous if you are not able to finish the trip or return. Small pinhole leaks take hours to deflate a board, however a cut from a knife, oyster, or other hazard can end your trip much faster. If you are in the middle of a multi-day trip you may not have 8+ hours to do a proper patch. In this case there is still an option for field repair.
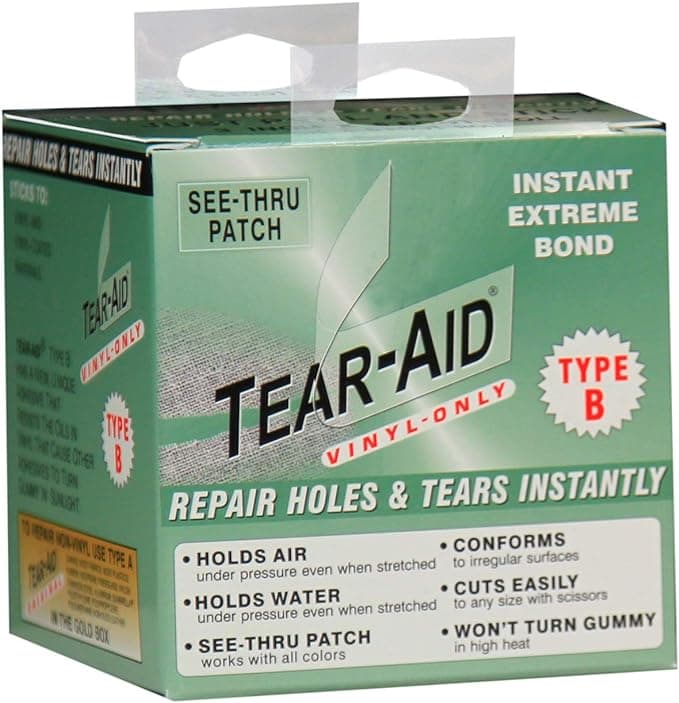
Tear-Aid Type B is designed specifically for pressurized PVC equipment.
Tear-Aid Type B Tape should be in the emergency kit for any SUP paddler on long trips. This tape is a temporary repair solution for punctures in your iSUP. You’ll still need to apply it to a clean, dry area (maybe through some single-use alcohol wipes in your kit as well!). However Tear-Aid Type B tape (it must be Type B – designed for Vinyl/PVC watercraft) will temporarily patch small punctures in your iSUP and hold at least some pressure in the board. You may not be able to inflate to your full 15-20 PSI, but it will hold enough pressure (5-10 PSI) to allow you to at least sit, kneel, or prone paddle to your destination or return to your starting point.
Seam Repairs
Small air leaks along the seam of an iSUP can often be repaired with a simple patch. However, full seam failures (separations) are, unfortunately, not often repairable at home. This is for two reasons. 1) The act of prepping and gluing the seam often exacerbates the problem by weakening, or continuing to open, the areas of the seam on either side of the failure point. 2) It is extremely difficult to accurately glue and hold the seam in the proper location and avoid trapping the drop stitch yarns in the repair.
The good news is seam failures are a sign of a manufacturing defect and are more than likely covered by your iSUP’s warranty. Contact customer service for your iSUP’s company for instructions on how to move forward with a warranty repair or replacement.
Final Thoughts
Getting a leak or puncture in your iSUP is an absolute bummer. But it’s not the end of the world, or even the end of the line for your iSUP. With just a few minutes’ work your iSUP can be ready to hit the water again the next day. As the co-founder of a SUP rental and tour outfitter that uses exclusively inflatable SUPs I’ve definitely had to do my share of repairs. Our worst case was when my partner accidentally walked a board into a sharp piece of metal on our trailer. That put a 2”x2” L-shaped hole into the tail of the board right next to the seam! That’s a gnarly puncture, but we were able to get it patched up and back into our fleet that week. That particular board went on to be in service for 3 more years before we finally sold it – still in perfect working condition. I like to think of patches on my iSUPs (and repairs on my other equipment) as badges of honor – I’ve used this piece of equipment hard and it’s still going strong.
Have you had to patch your iSUP or repair another piece of equipment? Do you have questions about how to fix your board, paddle, or other gear? Let us know in the comments below!

Jen Stronge says
Hi I have some either claw or teeth holes in my iSUP- I had left it, inflated, stashed in some trees overnight, next to the lakeshore. Next morning SUP was deflated and I saw the gashes…with a steaming pile of bear poop alongside. To repair it…all under one patch? Do I need to be worried about getting glue on the inside and then having the top and bottom adhere to each other? Thanks
Mike Carney says
Yowza! First I’ve heard of a bear attack on a paddle board!
Putting it all under one patch or multiple will depend on the location of the holes/tears. If they are close to each other (within 3″) I would use a continuous patch. There is some concern with getting glue inside the board, however with appropriate glues for iSUPs (like HH-66 or Stabond) they are typically a contact cement where you prep each surface and apply a layer of cement to each surface, allow it to get tacky, then press the layers together. As long as you are using thin layers per the glue instructions, there should be minimal squeeze out. Best of luck (and send us some pictures of that damage for the hall of fame!)